Install on Shopify
April 15, 2026
Add live chat, AI support, and order tools to your Shopify store in minutes — no coding required.
What You Get With LenoChat on Shopify
Before diving into the installation steps, here is a summary of everything LenoChat adds to your Shopify store once it is connected. Every feature listed below is available immediately after setup and requires no additional configuration to start working.
- Live Chat — a fully branded chat widget appears on every page of your storefront so customers can start a conversation at any point during their shopping journey.
- Leno AI Automated Responses — the AI agent handles common customer questions 24/7, including shipping queries, return policies, and product questions, without agent involvement.
- View Customer Cart — when a customer starts a chat, agents can see the items currently in their cart and their cart total directly in the LenoChat conversation panel, allowing context-aware support.
- Search & View Orders — agents can search and open any Shopify order by customer name, email, or order number from within the LenoChat conversation sidebar — no switching between tabs.
- Edit Shipping Address — agents with appropriate permissions can update a customer's shipping address on an open Shopify order directly from the LenoChat dashboard.
- Order Tracking Widget — display an order tracking card inside the chat widget so customers can self-serve their order status without needing to contact support.
- AI Product Sync — Leno AI can learn your Shopify product catalogue so it can answer product-specific questions accurately using your real inventory data.
Step 1: Install the LenoChat App from the Shopify App Store
The LenoChat app is listed in the official Shopify App Store. You install it the same way as any other Shopify app — directly from the App Store listing page. No manual file uploads or theme edits are needed at this stage.
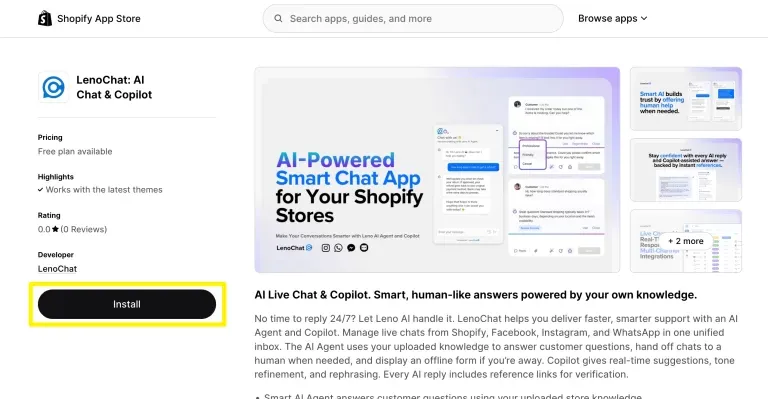
- Step 1: Open the Shopify App Store in your browser and search for 'LenoChat', or navigate directly to the LenoChat app listing page.
- Step 2: On the LenoChat app listing page, review the features and screenshots, then click the Install button.
- Step 3: You will be redirected to your Shopify admin, where Shopify confirms which store you are installing the app on. Confirm the correct store is selected before proceeding.
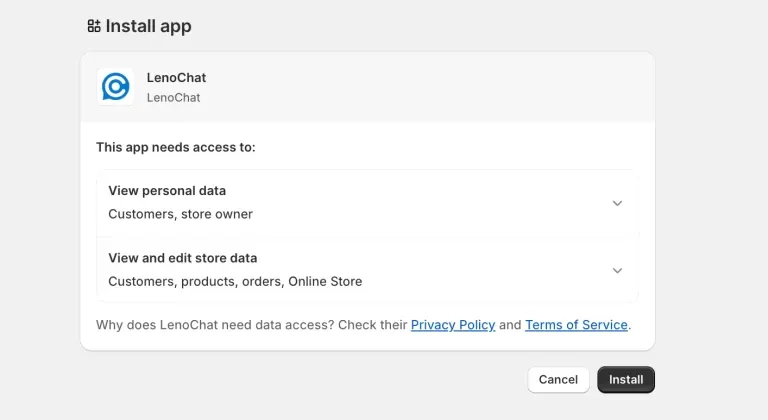
- Step 4: A permissions screen appears listing everything LenoChat needs access to. Review the permissions carefully — see the next section for a detailed explanation of each permission.
Reviewing Shopify Permissions
Before you approve the installation, Shopify shows a permissions screen listing the data LenoChat needs to function. These permissions are read-scoped where possible, meaning LenoChat reads your store data to surface it to agents but does not modify it unless you take an explicit action (such as editing a shipping address). Understanding these permissions helps you make an informed decision.
- Read Customers — allows LenoChat to match a chat visitor to their Shopify customer record so agents can see the customer's name, email, order history, and current cart without searching manually.
- Read Orders — allows agents to search and view Shopify orders from inside the LenoChat conversation panel. This is the foundation of the order search and cart view features.
- Read Products — allows Leno AI to access your product catalogue so it can answer product-specific questions accurately. Required for the AI product sync feature.
- Read Themes and Write Themes — required to enable the LenoChat widget via App Embeds in your Shopify theme. Writing to themes is scoped to enabling or disabling the app embed only.
- Write Script Tags — used to inject the LenoChat widget script into your storefront pages. This is how the chat bubble appears on every page of your store.
- Write Products — required for Leno AI product sync to keep the AI's knowledge of your catalogue up to date when you add or modify products.
- Step 5: Once you have reviewed the permissions, click Install app to approve them and proceed to the next step.
Step 2: Create or Log In to Your LenoChat Account
After approving the Shopify permissions, you are redirected to the LenoChat signup page. If you already have a LenoChat workspace, you can log in to link the installation to your existing account. If you are new to LenoChat, you can create a free account in under a minute.
- Step 1: On the LenoChat signup page, enter your email address, a password, and your company website URL, then click Join Now.
- Step 2: Check your inbox for a verification email from LenoChat and confirm your address. The widget installation continues automatically once your account is verified.
- Step 3: If you already have a LenoChat account, click the 'Already have a LenoChat account? Log in' link on the signup page instead of creating a new account. Logging in will link the Shopify installation to your existing workspace.
- Step 4: Once logged in or registered, LenoChat automatically links your Shopify store credentials to your workspace. A 'Connecting to Shopify' progress screen confirms the integration is being set up.

Step 3: Enable the Chat Widget in Your LenoChat Dashboard
After your account is linked, you need to navigate to the Shopify integration settings in your LenoChat dashboard to confirm the connection and open the Shopify Theme Editor. This step bridges your LenoChat account to your store's live theme.
- Step 1: Log in to your LenoChat dashboard at my.lenochat.com.
- Step 2: In the left-hand sidebar, click Settings.
- Step 3: Under the Integrations section of the settings menu, select Shopify.
- Step 4: On the Shopify integration page, you will see a notice: 'The widget is currently not visible.' This is expected — the widget still needs to be enabled inside Shopify's Theme Editor. Click the 'Go to theme editor' button to proceed.
- Step 5: Shopify's Theme Editor opens in a new tab or redirects you to your Shopify admin. The correct theme is already selected based on your active theme.

Step 4: Activate the Widget in the Shopify Theme Editor
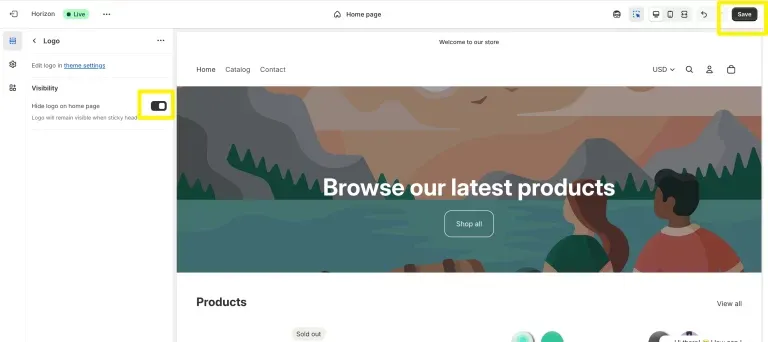
Shopify manages third-party app widgets through a feature called App Embeds. This is a native Shopify mechanism that allows apps to add functionality to your storefront without editing your theme's code files. You enable the LenoChat widget here using a single toggle — no theme code editing is required.
- Step 1: In the Shopify Theme Editor, look for the App Embeds option in the left-hand sidebar. If you do not see it immediately, it may be located under a 'Theme settings' or expandable section — click to expand it.
- Step 2: In the App Embeds list, find the LenoChat Chat Widget entry and toggle it to the ON (enabled) position. The toggle turns blue or green when active.
- Step 3: Click the Save button in the top-right corner of the Theme Editor. This applies the change to your live storefront — the chat bubble will now appear for visitors.
- Step 4: The App Embeds approach means the widget is cleanly removed if you ever uninstall the LenoChat app — no leftover code fragments remain in your theme.
Step 5: Verify the Chat Widget Is Live
After saving in the Theme Editor, return to your LenoChat dashboard and confirm the installation completed successfully. LenoChat shows a success confirmation once it detects the widget is active on your storefront.
- Step 1: Return to your LenoChat dashboard and navigate to Settings → Integrations → Shopify.
- Step 2: The integration page now shows a success confirmation: the chat widget status updates from 'not visible' to 'active'. You may see a 'Step 2: Verify Activation' confirmation step on this page.
- Step 3: Click 'Go to Website' to open your Shopify storefront in a new tab. Confirm the LenoChat chat bubble is visible in the bottom corner of the page.
- Step 4: Click the chat bubble to open the widget and verify it loads correctly. If your Leno AI agent is configured, it will greet the visitor automatically. If not, the widget opens in standard live chat mode.
- Step 5: In your LenoChat dashboard, navigate to Conversations to confirm that any test conversations you started from the storefront appear in your inbox.

Using Shopify Order Data Inside LenoChat
Once LenoChat is connected to Shopify, agents gain access to real-time Shopify data directly within any customer conversation. This eliminates the need to switch between LenoChat and your Shopify admin when handling customer queries, making support significantly faster.
- View Customer Cart — when a visitor starts a chat, the Shopify tab in the conversation panel shows the items currently in their cart along with the cart total and currency. Agents can reference this to proactively suggest related products or clarify what the customer is about to purchase.
- Search Orders — type a customer's name, email address, or order number into the order search field in the Shopify tab. Results appear instantly and show order status, financial status (paid, refunded, partially paid), fulfillment status (fulfilled, unfulfilled, partially fulfilled), and item details including product images, SKUs, and quantities.
- Edit Shipping Address — on open (unfulfilled) orders, agents can update the shipping address directly from LenoChat. This is useful when a customer contacts support immediately after placing an order with an incorrect delivery address.
- Order Tracking — enable an order tracking card inside the chat widget so customers can check their shipment status without starting a conversation. Configure this in Settings → Widget Customisation → Tracking Orders.
- Leno AI Product Knowledge — after installation, go to Settings → Leno AI → Products and run an initial product sync. Leno AI will import your Shopify product catalogue and use it to answer product-specific questions accurately in automated responses.
LenoChat Plans and Shopify Feature Availability
| Feature | Free | Plus | Pro |
|---|---|---|---|
| Chat widget on Shopify storefront | Yes | Yes | Yes |
| Unlimited live chats | Yes | Yes | Yes |
| View customer cart in conversations | Yes | Yes | Yes |
| Search and view Shopify orders | Yes | Yes | Yes |
| Edit shipping address | Yes | Yes | Yes |
| Leno AI automated responses | 100 / month | Included | Included |
| AI product sync (Shopify catalogue) | Limited | Yes | Yes |
| Remove 'Powered by LenoChat' badge | No | No | Yes |
| Custom AI agent name and icon | No | No | Yes |