Add LenoChat Plugin to Your WordPress Site
April 15, 2026
Install the LenoChat plugin on any WordPress site in minutes — no theme editing or embed code required.
Why Use the WordPress Plugin?
WordPress powers over 40% of all websites on the internet, and the LenoChat plugin is built specifically to make installation seamless on this platform. Instead of manually placing a JavaScript snippet in your theme's header.php file — which requires code access and breaks on theme updates — the plugin handles the embed code injection automatically on every page of your site. There are several advantages to using the dedicated plugin over a manual code embed:
- No code editing required — the plugin injects the chat widget script automatically on every page of your site, including custom post types, WooCommerce product pages, and landing pages.
- Survives theme updates — the widget embed code is stored in the plugin layer, not in your theme files, so it persists even when you change or update your WordPress theme.
- Widget visibility control — toggle the chat widget on or off globally from the plugin settings panel, or configure availability from your LenoChat dashboard without touching WordPress.
- Secure authentication — the plugin connects to your LenoChat account using your email and password rather than requiring you to manually copy and paste API keys or license codes.
- Automatic updates — once installed from the WordPress Plugin Directory, the plugin receives updates automatically alongside your other WordPress plugins whenever new versions are released.
Requirements Before You Begin
Before installing the LenoChat plugin, make sure the following requirements are met. Attempting to install on an incompatible environment may result in the plugin not appearing in your WordPress admin panel or the chat widget not loading correctly on your site.
- WordPress version 5.0 or higher — the plugin uses modern WordPress APIs and is not supported on older versions. Check your WordPress version by navigating to Dashboard → Updates in the WordPress admin panel.
- Administrator access — you must be logged in to your WordPress admin account with the Plugins menu visible. Editor-level accounts and below do not have permission to install plugins.
- An active LenoChat account — you will need your LenoChat email address and password to connect the plugin after installation. If you do not have an account, sign up at lenochat.com before proceeding.
- An outbound internet connection from your server — the plugin communicates with LenoChat's servers to authenticate your account and load the widget script. Servers with outbound firewalls that block external HTTPS connections may need to whitelist LenoChat's CDN domain.
Step 1: Navigate to the WordPress Plugin Directory
The WordPress Plugin Directory is the official repository of free WordPress plugins, maintained by Automattic. The LenoChat plugin is published here and can be installed with a single click from inside your WordPress admin panel — you do not need to download any files, use FTP, or edit any server configuration.
- Step 1: Log in to your WordPress admin panel. The URL is typically your-domain.com/wp-admin. Enter your administrator username and password and press Log In.
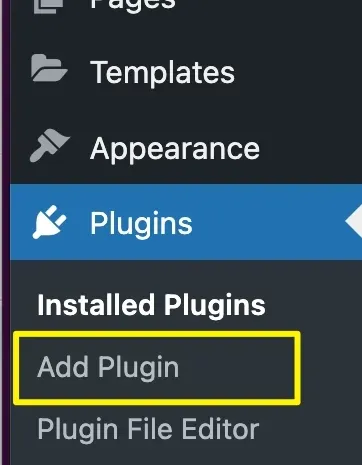
- Step 2: In the left-hand navigation sidebar, hover over Plugins to expand the submenu.
- Step 3: Click Add New (or Add New Plugin in newer WordPress versions) from the submenu. This opens the official WordPress Plugin Directory search interface where you can browse and install plugins directly.
Step 2: Search for and Install the LenoChat Plugin
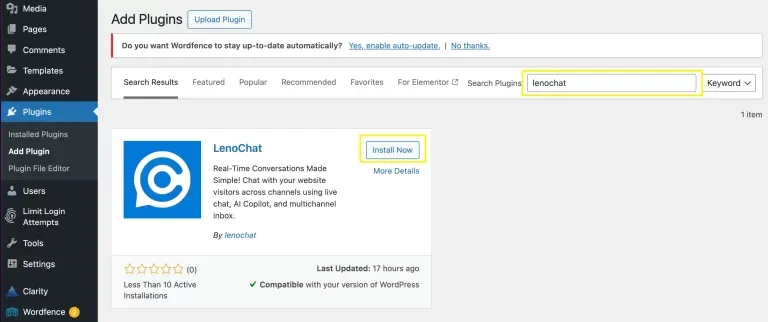
Once you are on the Add Plugins screen, use the search bar to find LenoChat in the Plugin Directory. WordPress searches the plugin repository in real time and shows matching results with ratings, active installation counts, and compatibility information. Always confirm you have selected the official LenoChat plugin before clicking Install Now.
- Step 1: In the search bar in the top-right corner of the Add Plugins page, type LenoChat and press Enter or wait for results to appear automatically.
- Step 2: Locate the LenoChat plugin card in the search results. The plugin is published by the LenoChat team and displays the LenoChat logo. Confirm the publisher name before proceeding to avoid installing a third-party plugin with a similar name.
- Step 3: Click the Install Now button on the LenoChat plugin card. WordPress downloads and installs the plugin files directly from the repository. The button text changes to Installing… during this process — wait for it to complete.
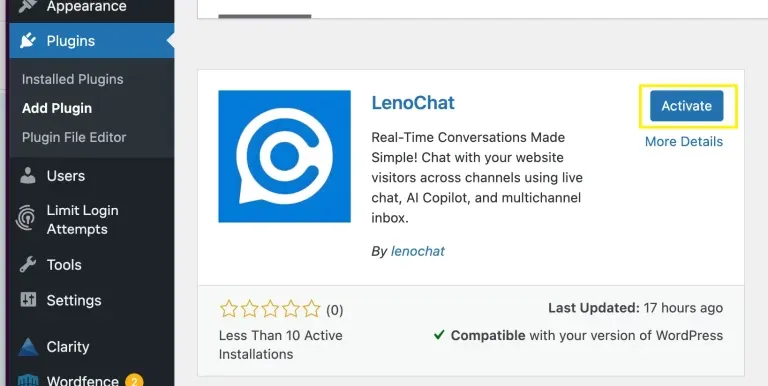
- Step 4: When installation finishes, the button text changes to Activate. Do not navigate away from this page while the installation is in progress, as leaving mid-install can result in incomplete plugin files.
Step 3: Activate the Plugin
Installing a plugin and activating it are two separate steps in WordPress. Installation downloads the plugin files to your server; activation enables it and registers it with WordPress so it can run code on every page load. The chat widget will not appear on your website until the plugin is both installed and activated.
- Step 1: After installation completes, click the Activate button that replaced the Install Now button on the plugin card. This is the fastest path from installation to activation.
- Step 2: Alternatively, if you navigated away from the Add Plugins screen, go to Plugins → Installed Plugins, find LenoChat in the list, and click the Activate link that appears below the plugin name and description.
- Step 3: Once activated, a success notice appears at the top of the Installed Plugins page, and a new LenoChat menu item appears in your WordPress admin sidebar. The plugin is now running on your site, but the chat widget is not yet visible to visitors — you still need to connect your LenoChat account in the next step.
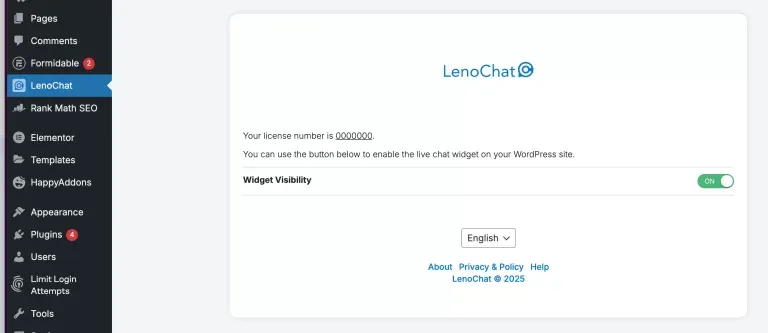
Step 4: Log In to LenoChat from the Plugin Settings
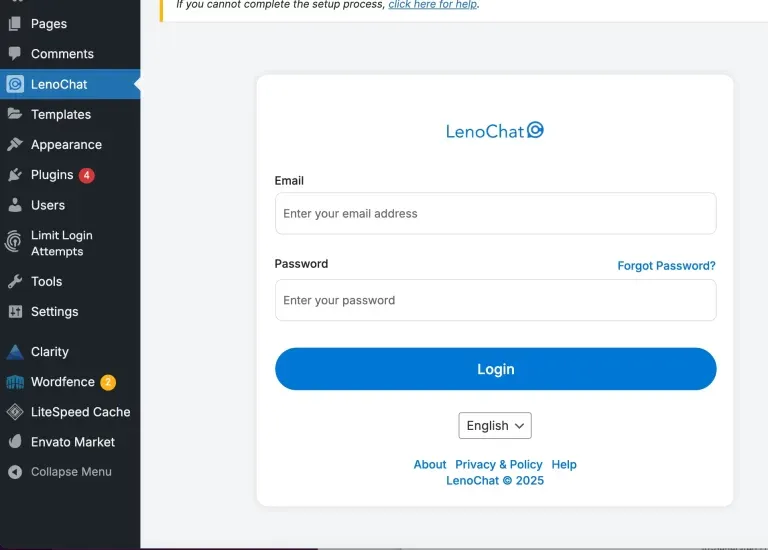
After activating the plugin, click the new LenoChat menu item in your WordPress admin sidebar to open the plugin settings page. From here, you authenticate the plugin by logging in with your LenoChat account credentials. This connects your WordPress site to your LenoChat workspace and configures the widget embed code automatically — no copy-pasting of script tags required.
- Step 1: Click LenoChat in the left-hand WordPress admin sidebar. If you do not see it, confirm the plugin is activated — go to Plugins → Installed Plugins and verify LenoChat shows as Active.
- Step 2: On the LenoChat plugin settings page, enter your LenoChat email address in the Email field. Use the same email you registered with at app.lenochat.com.
- Step 3: Enter your LenoChat account password in the Password field.
- Step 4: Click the Log In button. The plugin sends your credentials securely to LenoChat's authentication servers. On success, your workspace is connected and the plugin settings page updates to show your workspace details and the Widget Visibility toggle.
- Step 5: If you see an error message after clicking Log In, double-check your credentials by signing in at app.lenochat.com directly. If you use single sign-on (SSO) or Google login to access LenoChat, you may need to set a standalone password from your LenoChat profile settings before using the plugin login form.
Step 5: Enable Widget Visibility
Once you are logged in to the LenoChat plugin, you have direct control over whether the chat widget is displayed on your WordPress site. The Widget Visibility toggle is the primary on/off switch for the entire widget — enabling it makes the chat bubble appear on every page of your site immediately, without any additional configuration.
- Step 1: On the LenoChat plugin settings page in your WordPress admin, locate the Widget Visibility toggle.
- Step 2: Toggle Widget Visibility to ON to make the chat widget visible to all visitors on your website. The widget script begins loading on every page immediately — no cache clearing or redeployment is needed.
- Step 3: To temporarily hide the chat widget across your entire site — for example, during site maintenance, A/B tests, or periods when your team is not staffed — toggle Widget Visibility to OFF. The plugin remains installed and your LenoChat account remains connected; the widget resumes the moment you toggle it back ON.
- Step 4: All other widget configuration — colours, branding, greeting messages, conversation starters, Leno AI settings, and chat hours — is managed from your LenoChat dashboard at app.lenochat.com. The WordPress plugin handles only installation and visibility; all appearance and behaviour settings live in the dashboard.
What Happens After Installation
Once the plugin is installed, activated, and connected to your LenoChat account, your WordPress site is fully integrated with LenoChat. Understanding what changes on your site and in your dashboard helps you confirm the integration is working correctly and prepares your team to start handling chats.
- Your WordPress site now loads the LenoChat widget JavaScript on every page — including blog posts, WooCommerce product pages, contact pages, and custom post types. No theme editing or manual embed code placement is required.
- Visitor conversations initiated through the widget on your WordPress site appear in real time in your LenoChat inbox under the Conversations section at app.lenochat.com.
- Leno AI, if configured and enabled in your workspace settings, begins handling incoming chat requests automatically. Visitors who start a chat receive an immediate AI response — no human agent needs to be online for conversations to begin.
- Your LenoChat dashboard's Visitors section begins populating with real-time visitor data — including page URLs, session duration, and geographic location — for every active visitor on your WordPress site.
- If you have configured Chat Hours in your LenoChat dashboard, the widget automatically switches to the offline state (showing an offline message or offline contact form) outside your defined business hours, regardless of whether the WordPress plugin's Widget Visibility toggle is ON.