How to Connect Your Facebook Messenger to LenoChat
April 15, 2026
Receive and reply to Facebook Messenger messages directly in LenoChat — alongside all your other channels.
What is Facebook Messenger Integration?
The Facebook Messenger integration connects your Facebook Business page to LenoChat so that every message sent to your page via Facebook Messenger appears as a conversation inside your LenoChat inbox. Your team can reply from LenoChat, and the response reaches the visitor in Messenger — the visitor never needs to leave Facebook. Leno AI can also handle incoming Facebook messages automatically, classifying visitor intent, delivering answers from your knowledge base, and escalating to a human agent when needed. This makes Facebook Messenger a fully supported channel alongside your website chat widget, Instagram DMs, and WhatsApp, all managed from a single dashboard.
Before You Begin: Requirements
Facebook Messenger integration requires a Facebook Business page, not a personal profile. Before starting the connection, make sure you meet all of the following requirements. Attempting the connection without these in place will result in an error or incomplete integration.
- A Facebook Business page that your brand or company owns — personal profiles cannot be connected to LenoChat.
- Admin access to the Facebook page — only page admins can grant the permissions required for LenoChat to receive and send messages on your behalf.
- A LenoChat account with access to Integrations settings — any workspace member who can modify settings can complete the connection.
- Your Facebook account must be logged in on the same browser session where you complete the OAuth flow — the connection dialog opens in a pop-up and uses your active Facebook session.
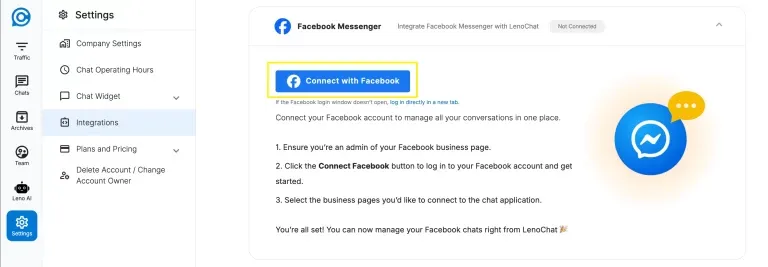
Step 1–3: Open Integrations and Click Connect
All channel integrations in LenoChat are managed from the Integrations panel in your workspace settings. Start there to initiate the Facebook connection. A pop-up window will open, beginning the Facebook OAuth authorisation flow — make sure your browser allows pop-ups from your LenoChat dashboard domain before proceeding.
- Step 1: Log in to your LenoChat dashboard and click Settings in the left-hand navigation sidebar.
- Step 2: Select Integrations from the settings menu. The Integrations panel lists every available channel — including Facebook Messenger, Instagram, and WhatsApp — each with a Connect or Configure button.
- Step 3: Locate the Facebook Messenger card and click Connect. A pop-up window opens, beginning the Facebook OAuth authorisation flow.
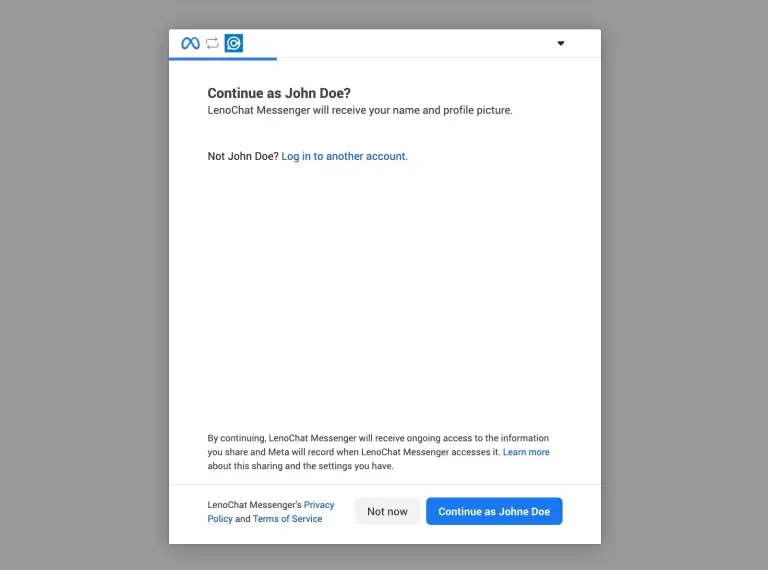
Step 3: Log In to Facebook Business
After clicking Connect, a pop-up dialog appears asking you to log in to Facebook. This is Facebook's own OAuth login screen — LenoChat never sees or stores your Facebook password. You are authorising LenoChat as an app through Facebook's official permissions framework. The connection is secured end-to-end by Facebook's authentication infrastructure.
- Step 4: In the pop-up, enter the email address and password associated with the Facebook account that is an admin of the page you want to connect.
- Step 5: Click Log In. If you are already logged into Facebook in the same browser, this step is skipped and you proceed automatically to the page selection screen.
- Step 6: If your Facebook account has two-factor authentication enabled, complete the 2FA challenge as prompted. LenoChat does not interact with this step — it is handled entirely by Facebook.
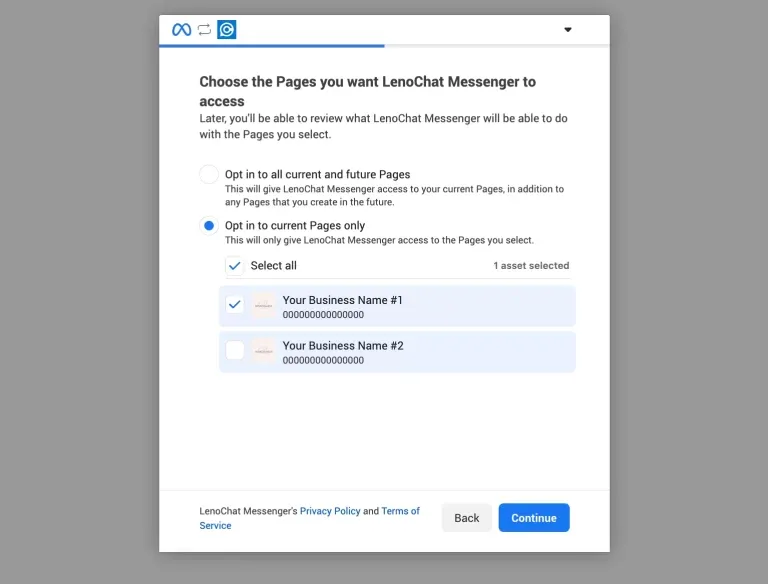
Steps 4–6: Select and Confirm Your Facebook Pages
After logging in, Facebook shows a list of all pages you have admin access to. You must select the pages you want to connect to LenoChat. Only selected pages will receive the integration — unselected pages remain completely unaffected and will not be connected.
- Step 7: Review the list of your Facebook pages displayed in the dialog. Each page appears with a checkbox on the left.
- Step 8: Click the checkbox next to each page you want to connect to LenoChat. You can select multiple pages at once — each will become a separate channel inside LenoChat after the flow completes.
- Step 9: Click Confirm to proceed with the selected pages. If you change your mind, click Back to return to the previous screen and deselect any pages.
- Note: If no pages appear in the list, verify that the Facebook account you logged in with has admin access to at least one Facebook Business page. Editor and Analyst roles are not sufficient — full Admin status is required.
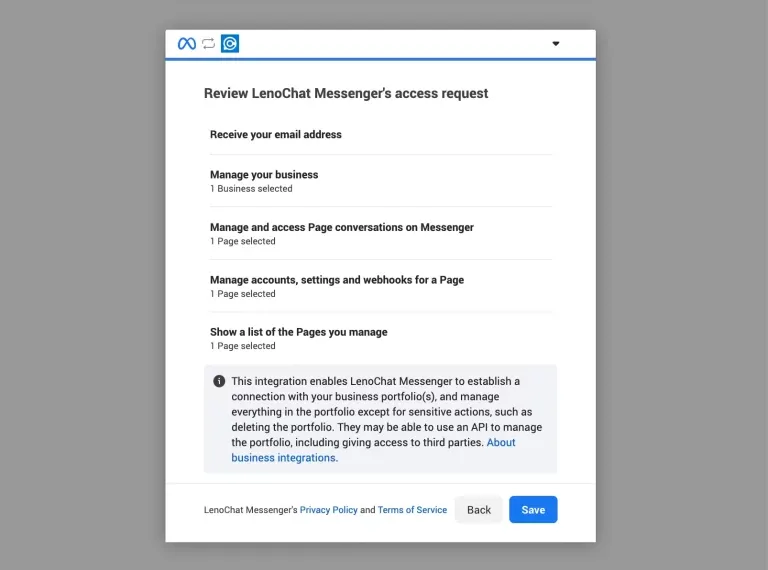
Step 7: Grant LenoChat the Required Permissions
After selecting your pages, Facebook presents the specific permissions that LenoChat is requesting. These permissions are the minimum required for LenoChat to receive and send messages on your behalf. Review the list carefully — LenoChat requests read and write access to Messenger messages only and does not request access to your personal profile, friends list, or ad account.
- pages_show_list — allows LenoChat to read the list of pages you manage so it can display them during setup.
- pages_messaging — allows LenoChat to send and receive Messenger messages on your connected Facebook page.
- pages_manage_metadata — allows LenoChat to subscribe to webhook events so messages are delivered in real time.
- business_management — allows LenoChat to verify your business page association during the OAuth handshake.
- Step 10: Click Continue to grant these permissions. If you do not grant all permissions, the integration will be incomplete and messages will not be delivered to LenoChat.
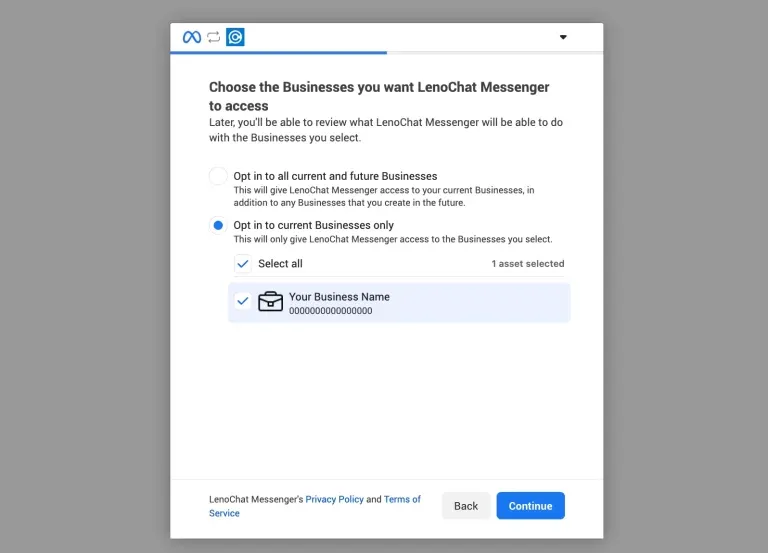
Step 8: Authorize LenoChat Business Access
The final authorisation screen confirms that you are allowing LenoChat, as a verified business application, to access the selected pages and their messaging capabilities. This step completes the OAuth handshake between Facebook and LenoChat. LenoChat exchanges Facebook's authorisation code for a long-lived page access token (valid for up to 60 days), which is stored securely and used to authenticate all future message requests.
- Step 11: Review the summary of what LenoChat will have access to — your connected page names and their associated Messenger inboxes.
- Step 12: Click Authorize to complete the connection. A secure authorisation code is sent from Facebook to LenoChat, which is exchanged for a long-lived page access token.
- Step 13: The pop-up will close automatically once authorisation is complete and return you to your LenoChat dashboard.
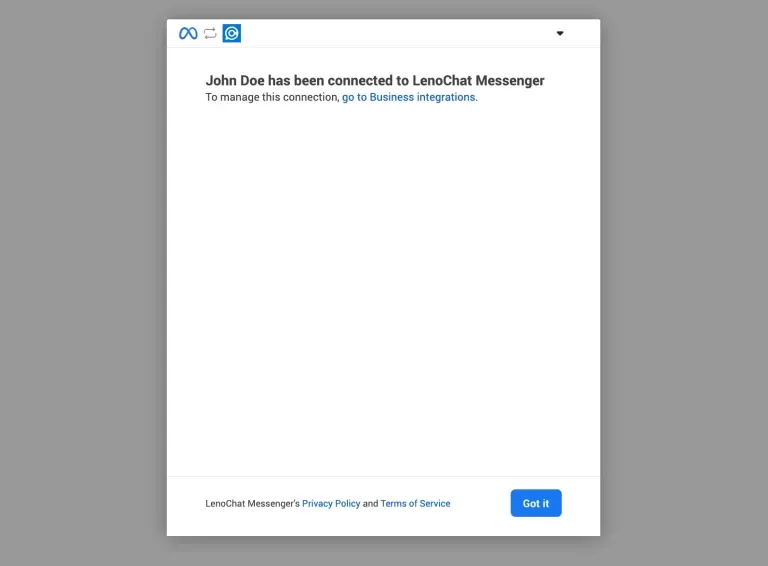
Step 9: Connection Confirmed
Once authorisation is complete, LenoChat shows a success confirmation dialog. This screen confirms that your Facebook pages have been linked successfully and that messages will start flowing into LenoChat immediately. From this moment, any message sent to your Facebook Business page via Messenger will appear as a new conversation in your LenoChat inbox within seconds.
- The confirmation screen lists the names of all Facebook pages that were successfully connected. Pages that could not be connected — for example, because the webhook subscription failed — are displayed separately with an error note.
- Click Done or close the dialog to return to the Integrations panel, where your connected pages now appear with a Connected status badge.
- Test the integration by sending a message to your Facebook page from another account — it should appear as a new conversation in your LenoChat inbox within a few seconds.
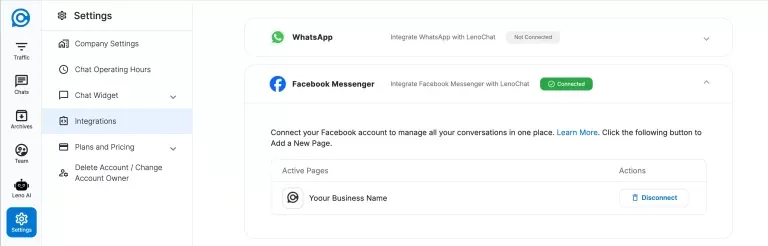
Step 10: Your Connected Pages in LenoChat
After completing the OAuth flow, your connected Facebook pages appear in the Integrations panel. Each page is listed with its name and a Connected status badge. From here you can manage which pages are active, toggle their visibility, or initiate disconnection at any time.
- Each connected page displays the page name as it appears on Facebook and a green Connected badge confirming the webhook subscription is active and messages are being received.
- To temporarily disable a page without disconnecting it fully, toggle the visibility switch next to the page. When toggled off, incoming Messenger messages from that page are still received by LenoChat but are paused — they will not be assigned to agents or Leno AI until you toggle the page back on.
- To permanently disconnect a page, click the Disconnect button next to the page entry. LenoChat immediately unsubscribes from Facebook's webhook for that page and removes the stored page access token. Messages sent after disconnection will not be received.
How Facebook Messages Flow into LenoChat
Once connected, every message sent to your Facebook page via Messenger is delivered to LenoChat in real time via a Facebook webhook. Understanding how messages flow through the system helps you configure your workspace for the best customer experience.
- When a visitor sends a message on Facebook Messenger, Facebook immediately calls the LenoChat webhook with the message content and sender information — including the visitor's first name, last name, and profile photo pulled from their Facebook profile.
- LenoChat creates a new conversation (or continues an existing one) identified by the visitor's Facebook Page-Scoped ID (PSID). Each Facebook user has a unique PSID per connected page, so LenoChat maintains complete conversation history across multiple sessions with the same visitor.
- If Leno AI is enabled for your workspace, the incoming Messenger message is automatically assigned to your AI agent. Leno AI reads the message, searches your knowledge base, and sends a reply — the response is delivered back to the visitor in Facebook Messenger within seconds.
- If Leno AI is not enabled or the visitor explicitly requests a human agent, the conversation is placed in the Unassigned queue and your agents are notified. Agents can claim the conversation and reply directly from the LenoChat inbox — all replies are delivered to the visitor's Messenger thread.
- Supported message types include text messages, images, and file attachments. Unsupported message types (such as Reels, video clips, and Stories replies) are flagged in the conversation with a system notification so agents are aware they exist, even though they cannot be rendered inside LenoChat.
Managing Connected Facebook Pages
You can manage all connected Facebook pages from the Integrations panel at any time. LenoChat provides per-page visibility controls and a straightforward disconnection process that cleanly removes all stored tokens and webhook subscriptions.
- To add more Facebook pages after the initial connection, click Connect Facebook again in the Integrations panel and complete the OAuth flow — existing connected pages are unaffected and will not need to be reconnected.
- Each connected page can be toggled on or off independently. Pages that are toggled off remain connected to LenoChat's webhook but messages are held in a paused state — they can be re-enabled at any time without repeating the OAuth flow.
- To disconnect a page permanently, click Disconnect next to the page. LenoChat calls the Facebook Graph API to remove the webhook subscription and deletes the stored page access token from its database. To reconnect the page in the future, you must complete the full OAuth flow again.
- If your page access token expires or is invalidated — for example, because you changed your Facebook password or revoked the app via Facebook Settings — the integration will stop receiving messages. The Integrations panel will show a Disconnected or Error status. Click Reconnect and repeat the OAuth flow to generate a fresh long-lived token.